Note
Click here to download the full example code
Brain Fiber ODF Visualisation
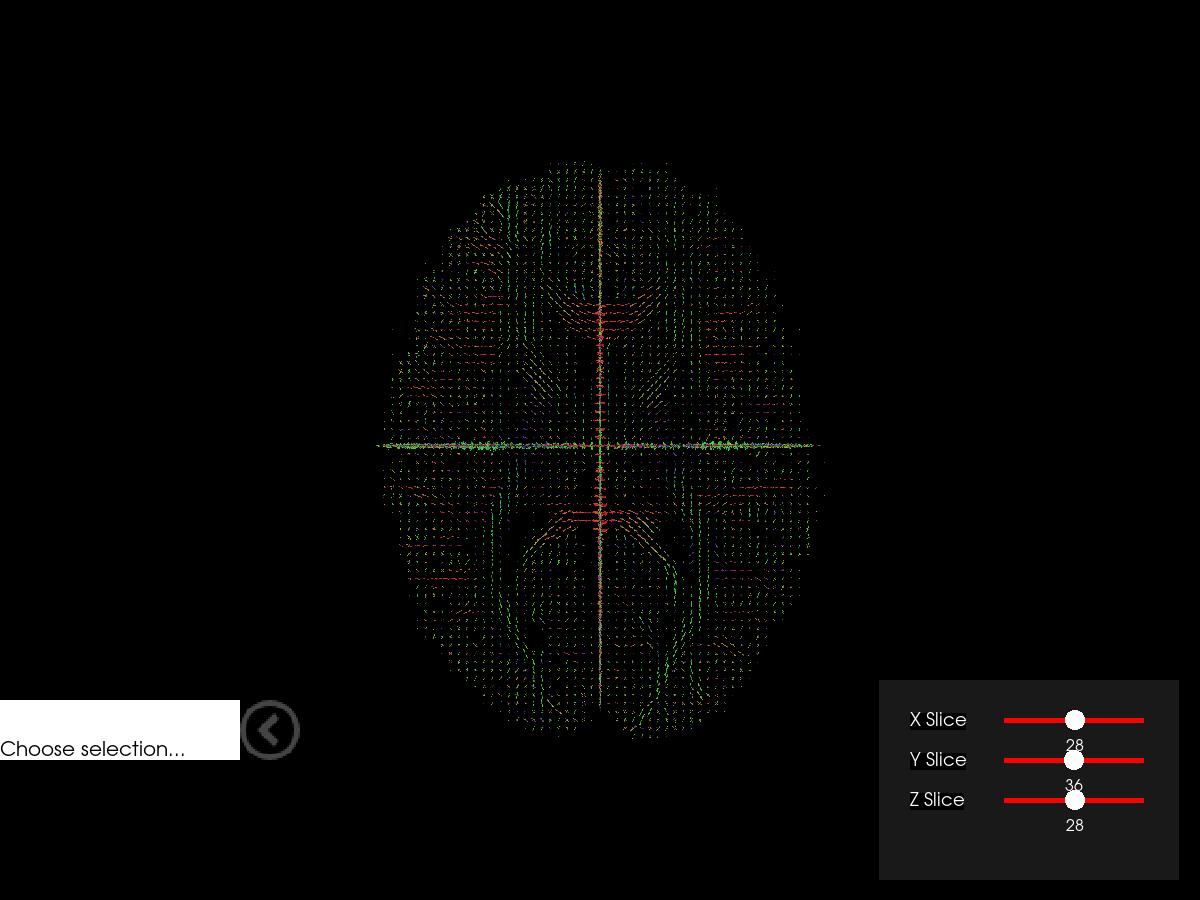
This example demonstrate how to create a simple viewer for fiber orientation distribution functions (ODF) using fury’s odf_slicer.
# First, we import some useful modules and methods.
import numpy as np
import nibabel as nib
from fury import actor, window, ui
from fury.data import read_viz_dmri, fetch_viz_dmri, fetch_viz_icons
from fury.utils import fix_winding_order
from dipy.reconst.shm import sh_to_sf_matrix
from dipy.data import get_sphere
Here, we fetch and load the fiber ODF volume to display. The ODF are expressed as spherical harmonics (SH) coefficients in a 3D grid.
fetch_viz_dmri()
fetch_viz_icons()

fodf_img = nib.load(read_viz_dmri('fodf.nii.gz'))
sh = fodf_img.get_fdata()
affine = fodf_img.affine
grid_shape = sh.shape[:-1]
Out:
Dataset is already in place. If you want to fetch it again please first remove the folder /Users/koudoro/.fury/dmri
Data size is approximately 12KB
Dataset is already in place. If you want to fetch it again please first remove the folder /Users/koudoro/.fury/icons
We then define a low resolution sphere used to visualize SH coefficients as spherical functions (SF) as well as a matrix B_low to project SH onto the sphere.
sphere_low = get_sphere('repulsion100')
B_low = sh_to_sf_matrix(sphere_low, 8, return_inv=False)
Now, we create a slicer for each orientation to display a slice in the middle of the volume and we add them to a scene.
# Change these values to test various parameters combinations.
scale = 0.5
norm = False
colormap = None
radial_scale = True
opacity = 1.0
global_cm = False

# ODF slicer for axial slice
odf_actor_z = actor.odf_slicer(sh, affine=affine, sphere=sphere_low,
                               scale=scale, norm=norm,
                               radial_scale=radial_scale, opacity=opacity,
                               colormap=colormap, global_cm=global_cm,
                               B_matrix=B_low)

# ODF slicer for coronal slice
odf_actor_y = actor.odf_slicer(sh, affine=affine, sphere=sphere_low,
                               scale=scale, norm=norm,
                               radial_scale=radial_scale, opacity=opacity,
                               colormap=colormap, global_cm=global_cm,
                               B_matrix=B_low)
odf_actor_y.display_extent(0, grid_shape[0] - 1, grid_shape[1]//2,
                           grid_shape[1]//2, 0, grid_shape[2] - 1)

# ODF slicer for sagittal slice
odf_actor_x = actor.odf_slicer(sh, affine=affine, sphere=sphere_low,
                               scale=scale, norm=norm,
                               radial_scale=radial_scale, opacity=opacity,
                               colormap=colormap, global_cm=global_cm,
                               B_matrix=B_low)
odf_actor_x.display_extent(grid_shape[0]//2, grid_shape[0]//2, 0,
                           grid_shape[1] - 1, 0, grid_shape[2] - 1)

scene = window.Scene()
scene.add(odf_actor_z)
scene.add(odf_actor_y)
scene.add(odf_actor_x)

show_m = window.ShowManager(scene, reset_camera=True, size=(1200, 900))
show_m.initialize()
Now that we have a ShowManager containing our slicer, we can go on and configure our UI for changing the slices to visualize.
line_slider_z = ui.LineSlider2D(min_value=0,
                                max_value=grid_shape[2] - 1,
                                initial_value=grid_shape[2] / 2,
                                text_template="{value:.0f}",
                                length=140)

line_slider_y = ui.LineSlider2D(min_value=0,
                                max_value=grid_shape[1] - 1,
                                initial_value=grid_shape[1] / 2,
                                text_template="{value:.0f}",
                                length=140)

line_slider_x = ui.LineSlider2D(min_value=0,
                                max_value=grid_shape[0] - 1,
                                initial_value=grid_shape[0] / 2,
                                text_template="{value:.0f}",
                                length=140)
We also define a high resolution sphere to demonstrate the capability to dynamically change the sphere used for SH to SF projection.
sphere_high = get_sphere('symmetric362')

# We fix the order of the faces' three vertices to a clockwise winding. This
# ensures all faces have a normal going away from the center of the sphere.
sphere_high.faces = fix_winding_order(sphere_high.vertices,
                                      sphere_high.faces, True)
B_high = sh_to_sf_matrix(sphere_high, 8, return_inv=False)
We add a combobox for choosing the sphere resolution during execution.
sphere_dict = {'Low resolution': (sphere_low, B_low),
               'High resolution': (sphere_high, B_high)}
combobox = ui.ComboBox2D(items=list(sphere_dict))
scene.add(combobox)
Here we will write callbacks for the sliders and combo box and register them.
def change_slice_z(slider):
    i = int(np.round(slider.value))
    odf_actor_z.slice_along_axis(i)


def change_slice_y(slider):
    i = int(np.round(slider.value))
    odf_actor_y.slice_along_axis(i, 'yaxis')


def change_slice_x(slider):
    i = int(np.round(slider.value))
    odf_actor_x.slice_along_axis(i, 'xaxis')


def change_sphere(combobox):
    sphere, B = sphere_dict[combobox.selected_text]
    odf_actor_x.update_sphere(sphere.vertices, sphere.faces, B)
    odf_actor_y.update_sphere(sphere.vertices, sphere.faces, B)
    odf_actor_z.update_sphere(sphere.vertices, sphere.faces, B)


line_slider_z.on_change = change_slice_z
line_slider_y.on_change = change_slice_y
line_slider_x.on_change = change_slice_x
combobox.on_change = change_sphere
We then add labels for the sliders and position them inside a panel.
def build_label(text):
    label = ui.TextBlock2D()
    label.message = text
    label.font_size = 18
    label.font_family = 'Arial'
    label.justification = 'left'
    label.bold = False
    label.italic = False
    label.shadow = False
    label.background_color = (0, 0, 0)
    label.color = (1, 1, 1)

    return label


line_slider_label_z = build_label(text="Z Slice")
line_slider_label_y = build_label(text="Y Slice")
line_slider_label_x = build_label(text="X Slice")

panel = ui.Panel2D(size=(300, 200),
                   color=(1, 1, 1),
                   opacity=0.1,
                   align="right")
panel.center = (1030, 120)

panel.add_element(line_slider_label_x, (0.1, 0.75))
panel.add_element(line_slider_x, (0.38, 0.75))
panel.add_element(line_slider_label_y, (0.1, 0.55))
panel.add_element(line_slider_y, (0.38, 0.55))
panel.add_element(line_slider_label_z, (0.1, 0.35))
panel.add_element(line_slider_z, (0.38, 0.35))

show_m.scene.add(panel)
Then, we can render all the widgets and everything else in the screen and
start the interaction using show_m.start().
However, if you change the window size, the panel will not update its
position properly. The solution to this issue is to update the position of
the panel using its re_align method every time the window size changes.
Finally, please set the following variable to True to interact with the
datasets in 3D.
interactive = False

if interactive:
    show_m.add_window_callback(win_callback)
    show_m.render()
    show_m.start()
else:
    window.record(scene, out_path='odf_slicer_3D.png', size=(1200, 900),
                  reset_camera=False)

del show_m

Total running time of the script: ( 0 minutes 3.394 seconds)