Note
Click here to download the full example code
Advanced interactive visualization
In DIPY we created a thin interface to access many of the capabilities
available in the Visualization Toolkit framework (VTK) but tailored to the
needs of structural and diffusion imaging. Initially the 3D visualization
module was named fvtk, meaning functions using vtk. This is still available
for backwards compatibility but now there is a more comprehensive way to access
the main functions using the following modules.
import numpy as np
from fury import actor, window, ui
In window we have all the objects that connect what needs to be rendered
to the display or the disk e.g., for saving screenshots. So, there you will
find key objects and functions like the Scene class which holds and
provides access to all the actors and the show function which displays
what is in the scene on a window. Also, this module provides access to
functions for opening/saving dialogs and printing screenshots
(see snapshot).
In the actor module we can find all the different primitives e.g.,
streamtubes, lines, image slices, etc.
In the ui module we have some other objects which allow to add buttons
and sliders and these interact both with windows and actors. Because of this
they need input from the operating system so they can process events.
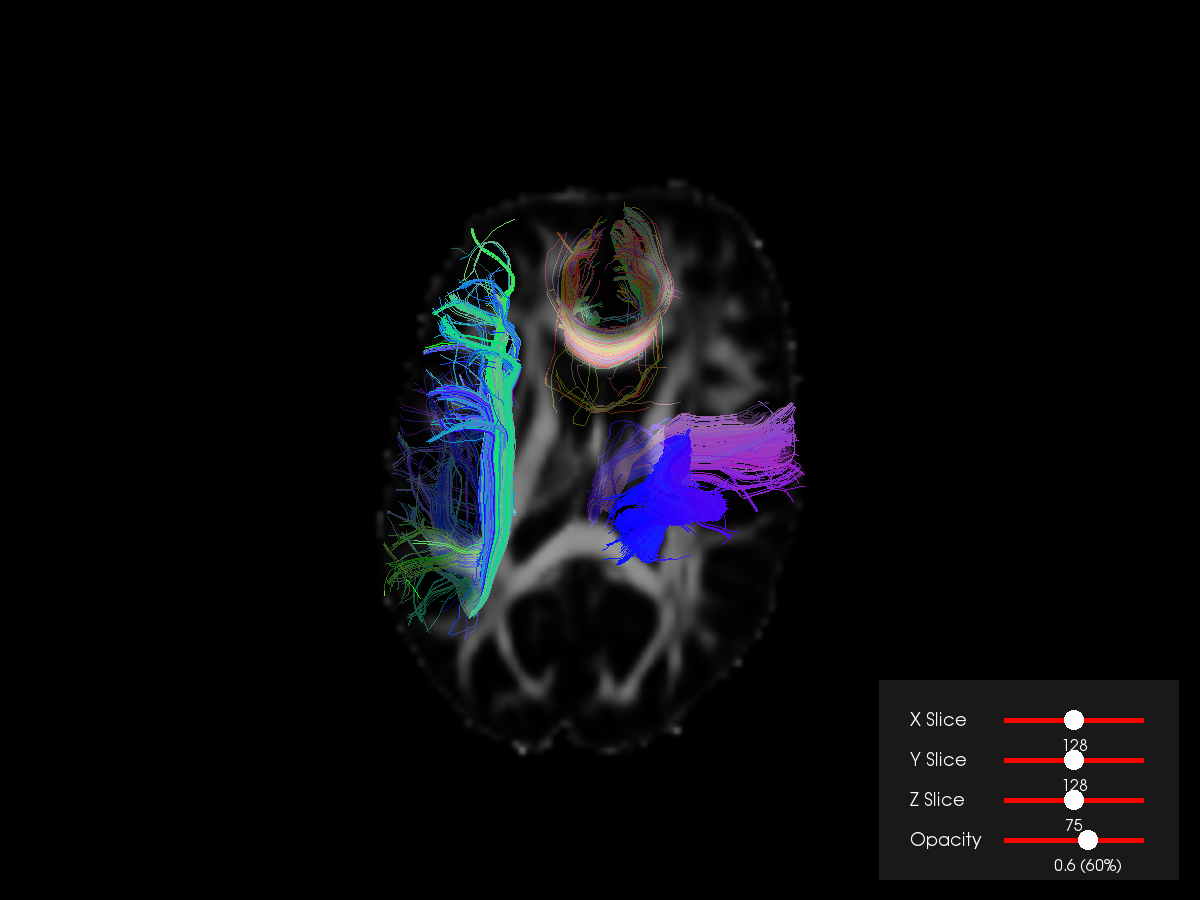
Let’s get started. In this tutorial, we will visualize some bundles
together with FA or T1. We will be able to change the slices using
a LineSlider2D widget.
First we need to fetch and load some datasets.
from dipy.data.fetcher import fetch_bundles_2_subjects, read_bundles_2_subjects

fetch_bundles_2_subjects()
Out:
Data size is approximately 234MB
Dataset is already in place. If you want to fetch it again please first remove the folder /Users/koudoro/.dipy/exp_bundles_and_maps
The following function outputs a dictionary with the required bundles e.g.
af left (left arcuate fasciculus) and maps, e.g. FA for a specific
subject.
res = read_bundles_2_subjects('subj_1', ['t1', 'fa'],
                              ['af.left', 'cst.right', 'cc_1'])
We will use 3 bundles, FA and the affine transformation that brings the voxel coordinates to world coordinates (RAS 1mm).
streamlines = res['af.left'] + res['cst.right'] + res['cc_1']
data = res['fa']
shape = data.shape
affine = res['affine']
With our current design it is easy to decide in which space you want the streamlines and slices to appear. The default we have here is to appear in world coordinates (RAS 1mm).
world_coords = True
If we want to see the objects in native space we need to make sure that all objects which are currently in world coordinates are transformed back to native space using the inverse of the affine.
if not world_coords:
    from dipy.tracking.streamline import transform_streamlines
    streamlines = transform_streamlines(streamlines, np.linalg.inv(affine))
Now we create, a Scene object and add the streamlines using the
line function and an image plane using the slice function.
scene = window.Scene()
stream_actor = actor.line(streamlines)

if not world_coords:
    image_actor_z = actor.slicer(data, affine=np.eye(4))
else:
    image_actor_z = actor.slicer(data, affine)
We can also change also the opacity of the slicer.
slicer_opacity = 0.6
image_actor_z.opacity(slicer_opacity)
We can add additonal slicers by copying the original and adjusting the
display_extent.
image_actor_x = image_actor_z.copy()
x_midpoint = int(np.round(shape[0] / 2))
image_actor_x.display_extent(x_midpoint,
                             x_midpoint, 0,
                             shape[1] - 1,
                             0,
                             shape[2] - 1)

image_actor_y = image_actor_z.copy()
y_midpoint = int(np.round(shape[1] / 2))
image_actor_y.display_extent(0,
                             shape[0] - 1,
                             y_midpoint,
                             y_midpoint,
                             0,
                             shape[2] - 1)
Connect the actors with the Scene.
scene.add(stream_actor)
scene.add(image_actor_z)
scene.add(image_actor_x)
scene.add(image_actor_y)
Now we would like to change the position of each image_actor using a
slider. The sliders are widgets which require access to different areas of
the visualization pipeline and therefore we don’t recommend using them with
show. The more appropriate way is to use them with the ShowManager
object which allows accessing the pipeline in different areas. Here is how:
show_m = window.ShowManager(scene, size=(1200, 900))
show_m.initialize()
After we have initialized the ShowManager we can go ahead and create
sliders to move the slices and change their opacity.
line_slider_z = ui.LineSlider2D(min_value=0,
                                max_value=shape[2] - 1,
                                initial_value=shape[2] / 2,
                                text_template="{value:.0f}",
                                length=140)

line_slider_x = ui.LineSlider2D(min_value=0,
                                max_value=shape[0] - 1,
                                initial_value=shape[0] / 2,
                                text_template="{value:.0f}",
                                length=140)

line_slider_y = ui.LineSlider2D(min_value=0,
                                max_value=shape[1] - 1,
                                initial_value=shape[1] / 2,
                                text_template="{value:.0f}",
                                length=140)

opacity_slider = ui.LineSlider2D(min_value=0.0,
                                 max_value=1.0,
                                 initial_value=slicer_opacity,
                                 length=140)
Now we will write callbacks for the sliders and register them.
def change_slice_z(slider):
    z = int(np.round(slider.value))
    image_actor_z.display_extent(0, shape[0] - 1, 0, shape[1] - 1, z, z)


def change_slice_x(slider):
    x = int(np.round(slider.value))
    image_actor_x.display_extent(x, x, 0, shape[1] - 1, 0, shape[2] - 1)


def change_slice_y(slider):
    y = int(np.round(slider.value))
    image_actor_y.display_extent(0, shape[0] - 1, y, y, 0, shape[2] - 1)


def change_opacity(slider):
    slicer_opacity = slider.value
    image_actor_z.opacity(slicer_opacity)
    image_actor_x.opacity(slicer_opacity)
    image_actor_y.opacity(slicer_opacity)


line_slider_z.on_change = change_slice_z
line_slider_x.on_change = change_slice_x
line_slider_y.on_change = change_slice_y
opacity_slider.on_change = change_opacity
We’ll also create text labels to identify the sliders.
def build_label(text):
    label = ui.TextBlock2D()
    label.message = text
    label.font_size = 18
    label.font_family = 'Arial'
    label.justification = 'left'
    label.bold = False
    label.italic = False
    label.shadow = False
    label.background = (0, 0, 0)
    label.color = (1, 1, 1)

    return label


line_slider_label_z = build_label(text="Z Slice")
line_slider_label_x = build_label(text="X Slice")
line_slider_label_y = build_label(text="Y Slice")
opacity_slider_label = build_label(text="Opacity")
Now we will create a panel to contain the sliders and labels.
panel = ui.Panel2D(size=(300, 200),
                   color=(1, 1, 1),
                   opacity=0.1,
                   align="right")
panel.center = (1030, 120)

panel.add_element(line_slider_label_x, (0.1, 0.75))
panel.add_element(line_slider_x, (0.38, 0.75))
panel.add_element(line_slider_label_y, (0.1, 0.55))
panel.add_element(line_slider_y, (0.38, 0.55))
panel.add_element(line_slider_label_z, (0.1, 0.35))
panel.add_element(line_slider_z, (0.38, 0.35))
panel.add_element(opacity_slider_label, (0.1, 0.15))
panel.add_element(opacity_slider, (0.38, 0.15))

show_m.scene.add(panel)
Then, we can render all the widgets and everything else in the screen and
start the interaction using show_m.start().
However, if you change the window size, the panel will not update its
position properly. The solution to this issue is to update the position of
the panel using its re_align method every time the window size changes.
global size
size = scene.GetSize()


def win_callback(obj, _event):
    global size
    if size != obj.GetSize():
        size_old = size
        size = obj.GetSize()
        size_change = [size[0] - size_old[0], 0]
        panel.re_align(size_change)


show_m.initialize()
Finally, please set the following variable to True to interact with the
datasets in 3D.
interactive = False

scene.zoom(1.5)
scene.reset_clipping_range()

if interactive:

    show_m.add_window_callback(win_callback)
    show_m.render()
    show_m.start()

else:

    window.record(scene, out_path='bundles_and_3_slices.png', size=(1200, 900),
                  reset_camera=False)

del show_m
Total running time of the script: ( 0 minutes 4.297 seconds)